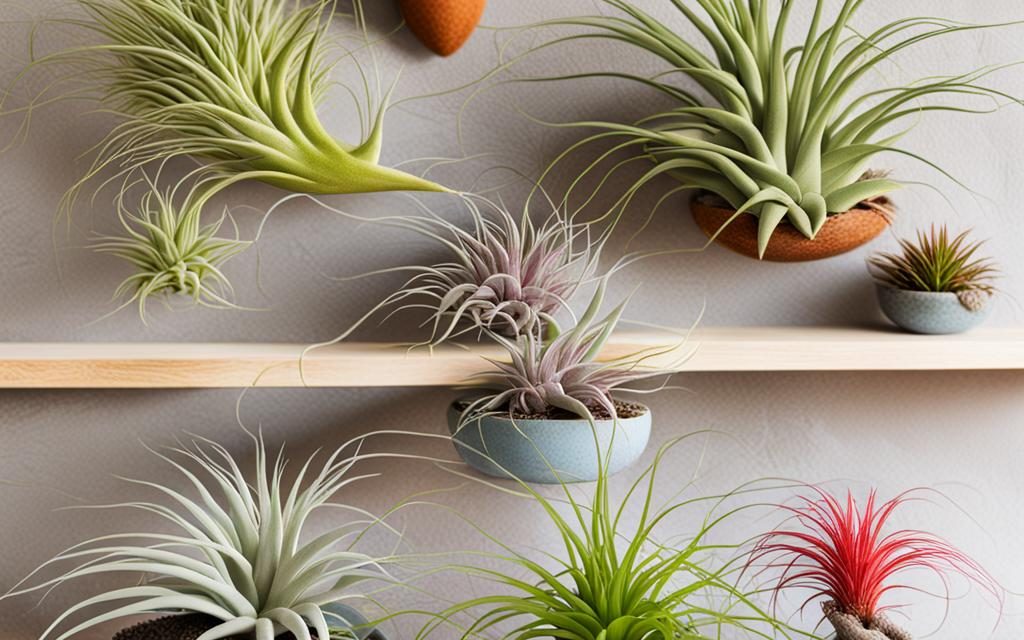
Tillandsias, commonly known as air plants, have captivated the hearts of indoor gardening enthusiasts worldwide. Their unique ability to grow without soil, combined with their striking forms and easy care, makes them an intriguing addition to any indoor space. This comprehensive guide will walk you through everything you need to know about growing Tillandsias indoors, ensuring they thrive and bring a touch of nature’s wonder into your home.
Understanding Tillandsias
Tillandsias belong to the bromeliad family and are native to the forests, mountains, and deserts of the Americas. These epiphytic plants absorb moisture and nutrients through their leaves from the air, rain, and debris around them. With over 650 species, their diversity in shape, size, and color is vast, offering endless possibilities for indoor display and decoration.
Choosing Your Tillandsia
When selecting Tillandsias for indoor cultivation, consider the plant’s light and humidity requirements, which can vary significantly between species. Some thrive in bright, indirect sunlight and high humidity, while others prefer more arid conditions. Popular species for indoor cultivation include Tillandsia ionantha, Tillandsia xerographica, and Tillandsia caput-medusae due to their striking appearances and adaptability to indoor environments.
Light Requirements
Light is crucial for the health and growth of Tillandsias. These plants prefer bright, indirect light for several hours each day. A location near an east or south-facing window is ideal, providing ample sunlight without direct exposure, which can scorch their leaves. If natural light is insufficient, consider using artificial grow lights, ensuring they’re placed at an appropriate distance to simulate natural sunlight conditions.
Watering Your Tillandsia
Watering Tillandsias can seem counterintuitive since they don’t grow in soil, but it’s a critical aspect of their care. The frequency of watering depends on the humidity and temperature of your indoor environment, as well as the plant’s specific needs. A general guideline is to water your air plants 1-3 times a week by soaking them in room temperature water for 20-30 minutes. After soaking, shake off any excess water and place them upside down on a towel to dry completely. This prevents water from accumulating in the base of the leaves, which can lead to rot.
Humidity and Air Circulation
Tillandsias thrive in environments with good air circulation and humidity levels between 50-70%. In dryer indoor climates, increasing humidity can be achieved by placing a humidifier nearby or regularly misting your plants between soakings. However, ensure that your Tillandsias dry thoroughly after misting to avoid fungal issues.
Feeding Your Tillandsia
While Tillandsias are not heavy feeders, they do benefit from occasional fertilization. Use a bromeliad or orchid fertilizer at a quarter strength, and apply it by misting once a month during the watering process. This provides the nutrients they need to grow and encourages vibrant blooms and offsets, known as “pups.”
Feeding Tillandsias, or air plants, is an essential aspect of their care that supports their growth, health, and flowering potential. Despite their minimalistic appearance and soilless lifestyle, these unique plants still require nutrients to thrive, just like any other plant. The right fertilization approach can make a significant difference in the vitality of your Tillandsias.
Understanding Tillandsia Nutritional Needs
Tillandsias absorb water and nutrients through their leaves via tiny structures called trichomes. This adaptation allows them to thrive in environments where traditional soil-based plants would struggle. However, because they don’t draw nutrients from the soil, they rely on their caretakers to provide them with the necessary food through foliar feeding.
Choosing the Right Fertilizer
The best fertilizers for Tillandsias are those formulated for bromeliads or orchids, as these are specifically designed to meet the nutritional needs of epiphytic plants. These fertilizers typically contain a balanced mix of nitrogen (N), phosphorus (P), and potassium (K), along with trace elements such as magnesium (Mg), calcium (Ca), and sulfur (S), which are crucial for plant health.
- Nitrogen supports leaf growth and development.
- Phosphorus is essential for energy transfer within the plant and supports flowering and root development.
- Potassium aids in overall plant health, improving disease resistance and water uptake.
Dilution Is Key
Tillandsias are sensitive to the concentration of fertilizer, and over-fertilization can lead to chemical burns, damaging the plant. To prevent this, dilute your chosen fertilizer to one-quarter of the strength recommended on the package. This weaker solution provides the plants with a gentle boost of nutrients without overwhelming them.
Application Method
Fertilization should be incorporated into your regular watering routine to ensure the nutrients are absorbed effectively. Here’s how to fertilize your Tillandsias:
- Dilute the Fertilizer: Prepare your diluted fertilizer solution according to the instructions, ensuring it’s at one-quarter strength.
- Misting: Use a spray bottle to mist the plants with the fertilizer solution. Ensure you cover the entire plant, as this simulates the natural way Tillandsias receive nutrients in the wild. Misting is particularly effective for Tillandsias because it targets their leaves, where nutrient absorption takes place.
- Soaking: Alternatively, you can add the diluted fertilizer to water and soak your Tillandsias in the solution for 20-30 minutes. This method is beneficial if you have several plants or larger specimens. After soaking, remember to shake off excess water and allow the plants to dry properly.
Frequency of Feeding
Fertilizing once a month during the growing season (spring through summer) is generally sufficient for Tillandsias. In the fall and winter, when plant growth naturally slows, you can reduce fertilization to once every two months or pause it altogether.
Signs of Proper Nutrition
When fertilized correctly, Tillandsias will display:
- Enhanced growth rate and leaf development
- Increased resistance to pests and diseases
- More vibrant blooms and coloration
- The production of offsets, or “pups,” which can eventually grow into new plants
Adjusting Your Approach
Observation is key when fertilizing Tillandsias. Pay attention to how your plants respond to fertilization and adjust the frequency and concentration as needed. If you notice signs of over-fertilization, such as brown or burned leaf tips, reduce the concentration of the fertilizer or extend the interval between applications.
Feeding your Tillandsias provides them with the essential nutrients they need to flourish. By following these guidelines, you can support your air plants in achieving their full potential, enjoying their unique beauty, and the satisfaction of nurturing them to vibrant health.
Temperature Considerations
Tillandsias are adaptable to a range of temperatures, but they thrive in conditions between 50°F and 90°F (10°C and 32°C). Avoid placing your air plants near cold drafts or heat sources, as extreme temperatures can stress the plants.
Pruning and Grooming
Pruning is not typically necessary for Tillandsias, but you can remove brown or dead leaves by gently pulling them away from the base. This helps maintain a tidy appearance and encourages healthy growth. If the tips of the leaves become dry or brown, you can trim them with sharp scissors, making a natural curve cut to mimic the leaf’s original shape.
Propagation
One of the joys of growing Tillandsias is their ability to produce pups or offsets after they bloom. These pups can be left to grow with the parent plant, creating a clump, or separated once they are about one-third the size of the parent plant. To separate a pup, gently twist and pull it away from the base of the mother plant.
After the parent plant blooms, it will start producing pups at its base. These pups are essentially new plants that can eventually grow and bloom on their own. Here’s a more detailed look at the propagation process:
Timing for Separation
- Observation: Keep an eye on the base of the blooming or blooming Tillandsia for the emergence of pups. These can appear before, during, or after the flowering period.
- Size Matters: It’s crucial to wait until the pups are about one-third to one-half the size of the parent plant before attempting to separate them. This size indicates that they have developed sufficient roots and leaves to sustain themselves independently.
Separating Pups from the Parent Plant
- Gentle Handling: Carefully hold the base of the pup and the parent plant. Gently twist and pull the pup away from the parent. The goal is to separate them without damaging either plant. If the pup doesn’t come away easily, it may need more time to develop. In some cases, a clean, sharp knife can be used to help separate them, but this is rarely necessary.
- Roots: Some pups will develop roots while still attached to the parent plant, but it’s not uncommon for pups to have few or no roots when they’re separated. Tillandsias are air plants and can absorb moisture and nutrients through their leaves, so the presence of roots is not critical for the pup to thrive.
After Separation
- Immediate Care: Once separated, treat the pups as you would a mature Tillandsia. Provide them with bright, indirect light, and adhere to the appropriate watering schedule. If you live in a particularly dry climate, you might need to water more frequently until the pup establishes itself.
- Mounting or Placing: You can place the separated pups on a piece of wood, in a terrarium, or any other spot that provides adequate air circulation and light. If you choose to mount them, use a harmless adhesive, fishing line, or plant-safe wire to secure them in place without damaging their leaves.
Encouraging Growth
- Fertilization: Applying a diluted, low-nitrogen fertilizer once a month during the growing season can encourage the pups to grow more vigorously. Be sure to dilute the fertilizer to about one-quarter strength to avoid burning the plants.
- Environmental Conditions: Ensure the pups are kept in an environment that meets their specific needs regarding humidity, temperature, and light. Each Tillandsia species may have slightly different requirements, so adjust care accordingly.
Patience is Key
- Growth Rate: Remember that Tillandsias are generally slow-growing plants. It can take several months to a year or more for a pup to reach a size where it might start producing its own pups or bloom.
- Observation: Regularly check on the health of your pups, looking out for signs of overwatering (rot) or under-watering (excessively dry or curly leaves). Adjust care routines as necessary to address any issues.
Propagation allows Tillandsia enthusiasts not only to expand their collection but also to share these fascinating plants with friends and family. It’s a rewarding process that highlights the cycle of growth and renewal in these remarkable plants. By following these steps, you can successfully propagate your Tillandsias and enjoy the beauty and diversity of these air plants for years to come.
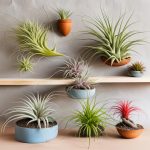
Displaying Your Tillandsias
The versatility of Tillandsias allows for a wide range of creative display options. They can be placed in terrariums, mounted on driftwood or bark, or simply set atop a piece of decorative stone. When mounting Tillandsias, avoid using copper wire or glue that can harm the plant. Instead, opt for a fishing line, wire, or a plant-safe adhesive.
Common Issues and Solutions
- Brown Leaf Tips: This can be a sign of under-watering or low humidity. Increase watering frequency and consider misting your plants more often.
- Rotting Base: Over-watering or insufficient drying after watering can lead to rot. Ensure your Tillandsias dry completely after soaking and improve air circulation around them.
- Lack of Blooms: Insufficient light can prevent Tillandsias from blooming. Move your plants to a brighter location or supplement them with artificial light.
Growing Tillandsias indoors offers a unique opportunity to engage with nature unconventionally. These fascinating plants require minimal care, making them suitable for gardeners of all levels. By providing the right light, water, and humidity, your Tillandsias can flourish, adding beauty and interest to your indoor spaces. Whether you’re a seasoned indoor gardener or new to the world of air plants, the care and cultivation of Tillandsias is a rewarding endeavor that brings a piece of the natural world into your home.

